Chevrolet Cobalt Service & Repair Manual: Brake Drum R&R
| 1. |
Raise and support the vehicle. |
| 2. |
Remove the tire and wheel assembly. |
| 3. |
Remove and discard the brake drum retainers
(1), if equipped, Fig. 1. |
| 4. |
Remove the brake drum (1), Fig.
2. |
| 5. |
If reinstalling the brake drum, use
the J-41013 Rotor Resurfacing Kit to clean the wheel hub flange
mating surface of the brake drum of any corrosion. |
| 6. |
Reverse procedure to install, noting
the following: |
| |
a. |
Adjust the drum brakes. |
| |
b. |
Ensure the park brake lever is in the
fully released position. |
| |
c. |
Release the park brake lever boot from
the floor console by applying light pressure inward on the sides
of the boot retainer. |
| |
d. |
Pull the boot away from the console
to expose the front park brake cable adjusting nut (1). |
| |
e. |
Release the tension from the park brake
cable system at the front cable adjusting nut. |
| |
f. |
Using only hand tools, loosen the adjusting
nut completely to the end of the front cable threaded rod. |
| |
g. |
Position tool No. J-21177-A drum to
brake shoe clearance gauge to widest point of the brake drum inside
diameter and firmly hand tighten the set screw on tool No. J-21177-A
drum to brake shoe clearance gauge . |
| |
h. |
Remove tool No. J-21177-A drum to brake
shoe clearance gauge from the brake drum and position it over the
corresponding brake shoe assembly at its widest point, Fig.
3. |
| |
i. |
While holding tool No. J-21177-A drum
to brake shoe clearance gauge in position, insert a 0.015 inch feeler
gauge between one side of tool No. J-21177-A drum to brake shoe
clearance gauge, and the corresponding brake shoe lining. |
| |
j. |
Rotate the brake shoe adjuster screw
until the brake shoe linings contact tool No. J-21177-A drum to
brake shoe clearance gauge and the feeler gauge. Specification brake
shoe lining-to-drum clearance: 0.015 inch. |
| |
k. |
Repeat the above steps for the opposite
brake drum and brake shoe assembly. |
| |
l. |
Install the rear tire and wheel assemblies. |
| |
n. |
Position the park brake lever boot
to the floor console and press the boot retainer into place to secure. |
| |
o. |
Apply the brakes two or three times
to seat and center the brake shoes on the brake drum. |
|
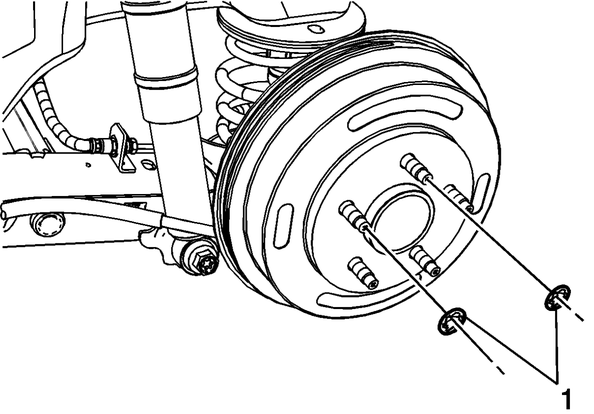
Fig. 1 Brake drum retainer replacement
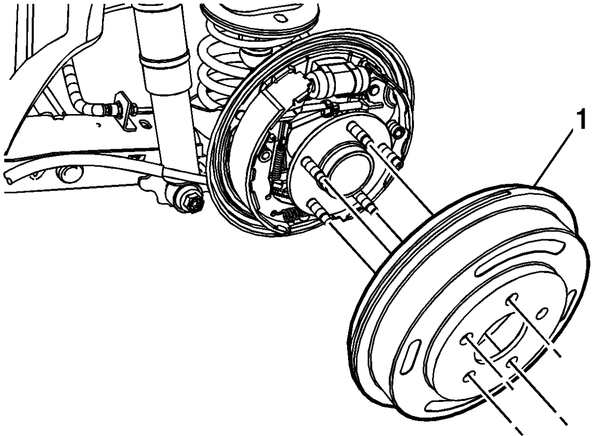
Fig. 2 Brake drum replacement
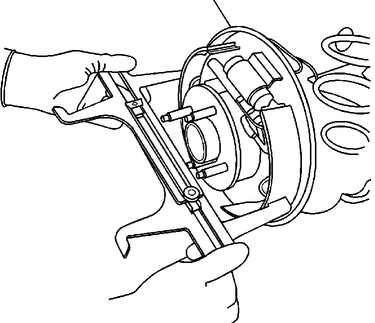
Fig. 3 Drum brake adjustment
A visual inspection must always
be performed to confirm the presence of aftermarket components, potential
collision damage, or areas of concern.
The ABS module is self moni ...
Caution: Avoid taking the following
actions when you service wheel brake components: Do not grind brake linings.
Do not sand brake linings. Do not clean wheel brake components with a dr ...
See also:
Chevrolet Cobalt Owners Manual. Climate Control System
The heating, cooling, and ventilation for the vehicle can
be controlled with this system.
Vehicles with Air Conditioning shown, without Air
Conditioning similar
A. Air Delivery Mode
Control.
B. Fan Control.
C. Temperature Control.
D. Air Conditioning.
E. Rear Window Defogger.
F. Recircul ...
Chevrolet Cobalt Owners Manual
Chevrolet Cobalt Service Manual
 Anti-Lock Brake System, Inspection
 Brake Drum, Reface