Chevrolet Cobalt Service & Repair Manual: Ball Joint, Replace
Front
| 2. |
Secure control arm in a suitable vise. |
| 3. |
Drill out three rivets retaining ball
joint to lower control arm. Install a 1/8 inch bit in order to make
a pilot hole through rivets. Complete drilling rivets using suitable
1/2 drill bit, Fig. 1. |
| 4. |
Remove ball joint from control arm,
Fig. 1. |
| 5. |
Reverse procedure to install, noting
the following: |
| |
a. |
Torque wheel lug nuts to 100
ft. lbs. |
| |
b. |
Torque ball joint to control
arm to 50 ft. lbs. |
| |
c. |
Torque control arm to front
frame bolts to 41 ft. lbs. |
| |
d. |
Torque control arm to rear frame
bolts to 74 ft. lbs. |
|
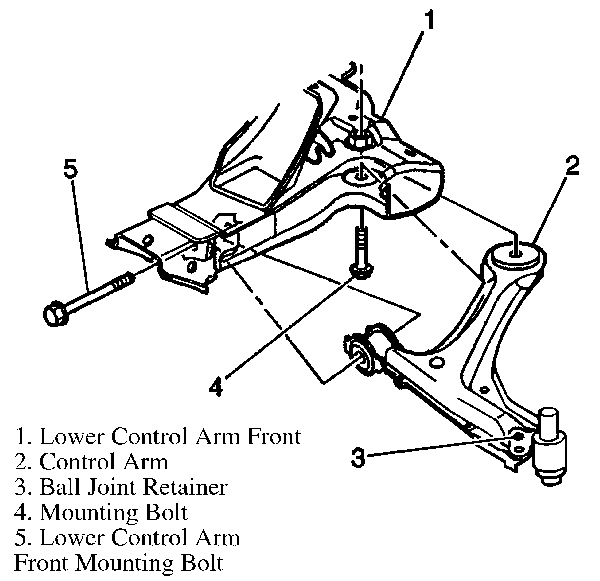
Fig. 1 Control arm mounting bolt removal
Initialization Sequence
The EBCM performs one initialization
test each ignition cycle. The initialization of the EBCM occurs when the
EBCM detects the there is a minimum of 500 RPM fro ...
Rear
1.
Raise and support vehicle.
2.
Support rear axle with suitable jack
stands near each shock absorber.
3.
...
See also:
Chevrolet Cobalt Owners Manual. Rear Door Security Locks (Sedan)
Security Lock Label shown
The rear door security
locks are located on the
inside edge of each rear
door. You must open the
rear doors to access
them. The label showing
lock and unlock positions
is located near the lock.
To set the locks, do the following:
1. Insert the key into the secur ...
Chevrolet Cobalt Owners Manual
Chevrolet Cobalt Service Manual
 Relearn
 Coil Spring, Replace