Chevrolet Cobalt Service & Repair Manual: Component Service
Engine Control Module (ECM)
| 1. |
Retrieve percentage of remaining engine
oil life using a scan tool, then record remaining engine oil life. |
| 2. |
Remove ECM cover, then disconnect body
wiring harness electrical connector from ECM, Fig. 1. |
| 3. |
Disconnect engine wiring harness from
ECM. |
| 4. |
Release retaining tab and remove ECM
from underhood junction block bracket. |
| 5. |
Reverse procedure to install. |
|
Camshaft Position (CMP) Sensor
Exhaust
| 1. |
Remove engine oil fill cap, then remove
intake manifold cover. |
| 2. |
Disconnect engine wiring harness electrical
connector from CMP sensor. |
| 3. |
Remove exhaust CMP sensor mounting
bolt, then the sensor and O-ring, Fig. 2. |
| 4. |
Reverse procedure to install, noting
the following: |
| |
a. |
Lubricate O-ring seal with clean engine
oil. |
| |
b. |
Torque mounting bolt to 89 inch
lbs. |
|
Intake
| 1. |
Remove engine oil fill cap, then remove
intake manifold cover. |
| 2. |
Disconnect engine wiring harness electrical
connector from CMP sensor. |
| 3. |
Remove intake CMP sensor mounting bolt,
then the sensor and O-ring, Fig. 2. |
| 4. |
Reverse procedure to install, noting
the following: |
| |
a. |
Lubricate O-ring seal with clean engine
oil. |
| |
b. |
Torque mounting bolt to 89 inch
lbs. |
|
Crankshaft Position (CKP) Sensor
| 1. |
Raise and support vehicle. |
| 2. |
Remove starter solenoid terminal nut,
then the positive battery cable terminal from starter. |
| 3. |
Remove starter solenoid wire terminal
from starter. |
| 4. |
Remove starter solenoid "S" terminal
nut. |
| 5. |
Remove engine harness terminal from
the starter. |
| 6. |
Remove starter motor bolts, then the
starter motor. |
| 7. |
Disconnect CKP sensor electrical connector. |
| 8. |
Remove CKP sensor mounting bolt, then
the CKP sensor and O-ring, Fig. 3. |
| 9. |
Reverse procedure to install, noting
the following: |
| |
a. |
Lubricate O-ring with a suitable mineral
based grease. |
| |
b. |
Torque sensor mounting bolt
to 71 inch lbs. |
| |
c. |
Torque starter motor bolts to
30 ft. lbs. |
|
Engine Coolant Temperature (ECT) Sensor
| 1. |
Drain coolant system to below ECT sensor
level. |
| 2. |
Disconnect ECT sensor electrical connector. |
| 4. |
Reverse procedure to install, noting
the following: |
| |
a. |
Coat threads with sealer GM Part No.
12346004, or equivalent. |
| |
b. |
Torque sensor to 89 inch lbs. |
|
Heated Oxygen Sensor (HO2S)
Sensor 1
| 1. |
Remove exhaust manifold heat shield. |
| 2. |
Disconnect HO2S electrical connector. |
| 3. |
Remove HO2S from exhaust manifold. |
| 4. |
Reverse procedure to install, noting
the following: |
| |
a. |
Coat threads of HO2S with anti-seize
compound GM Part No. 12377953, or equivalent. |
| |
b. |
Torque sensor to 22 ft. lbs. |
|
Sensor 2
| 1. |
Raise and support vehicle. |
| 2. |
Remove drive shaft heat shield. |
| 3. |
Disconnect HO2S electrical connector
in engine compartment. Note routing of HO2S electrical harness for
installation reference. |
| 4. |
Carefully bend edge of channel on lefthand
side of exhaust heat shield outboard, just enough to release HO2S
electrical harness. |
| 5. |
Remove HO2S from exhaust pipe, then
carefully lower HO2S electrical harness away from underbody. |
| 6. |
Reverse procedure to install, noting
the following: |
| |
a. |
Coat sensor threads with anti-seize
compound GM Part No. 12377953, or equivalent. |
| |
b. |
Torque sensor to 30 ft. lbs. |
|
Accelerator Pedal Position (APP) Sensor
| 1. |
Remove Connector Position Assurance
(CPA) cover from APP sensor connector. |
| 2. |
Disconnect APP sensor harness connector. |
| 3. |
Remove APP assembly to accelerator
pedal assembly attaching bolts. |
| 4. |
Remove APP assembly from accelerator
pedal. |
| 5. |
Reverse procedure to install. Torque
sensor attaching bolts to 80 inch lbs. |
|
Manifold Absolute Pressure (MAP) Sensor
| 1. |
Remove air cleaner outlet duct. |
| 2. |
Remove intake manifold cover. |
| 3. |
Remove throttle body as outlined under
"Throttle Body." |
| 4. |
Disconnect engine harness electrical
connector from MAP sensor. |
| 5. |
Remove MAP sensor and seal. |
| 6. |
Reverse procedure to install. Lubricate
MAP sensor seal with clean engine oil. |
|
Mass Air Flow/Intake Air Temperature (MAF/IAT) Sensor
| 1. |
Disconnect engine harness electrical
connector from MAF/IAT sensor. |
| 2. |
Remove MAF/IAT sensor retaining screws. |
| 3. |
Remove sensor from air cleaner inlet
duct. |
| 4. |
Reverse procedure to install. |
|
Throttle Body
| 1. |
Remove air cleaner outlet duct. |
| 2. |
Remove intake manifold cover. |
| 3. |
Disconnect throttle actuator control
electrical connector. |
| 4. |
Remove throttle body bolts attaching
bolts, then the throttle body. |
| 5. |
Reverse procedure to install. Torque
throttle body attaching bolts to 89 inch lbs. |
|
Fuel Rail
| 1. |
Relieve fuel system pressure as outlined
under "Precautions." |
| 2. |
Remove air cleaner outlet duct assembly. |
| 3. |
Disconnect fuel line fitting from fuel
rail. |
| 4. |
Disconnect fuel injector harness connectors. |
| 5. |
Remove fuel rail attaching studs. |
| 6. |
Pull fuel rail back and upward to remove
fuel injectors from cylinder head ports. |
| 7. |
Rotate fuel rail to position injectors
downward, then remove fuel rail. |
| 8. |
Reverse procedure to install. Torque
fuel rail studs to 89 inch lbs. |
|
Wiring Harness & Connector Repair
Wiring Connector Repair
| 1. |
Disconnect connector being repaired
from its mating half. |
| 2. |
Cut off existing wire connector directly
behind insulator and remove six inches of tape from harness. |
| 3. |
Stagger cut wires on harness side approximately
one-half inch apart. |
| 4. |
Remove one inch of insulation from
each wire on harness side. |
| 5. |
Stagger cut matching wires on repair
connector in opposite order as was done on harness side of repair.
Ensure overall length is same as original. |
| 6. |
Remove one inch of insulation from
each wire. |
| 7. |
Place piece of heat shrink tubing over
one side of wire. Ensure tubing will be long enough to cover and
seal entire repair area. |
| 8. |
Spread strands of wire apart on each
end of exposed wires. |
| 9. |
Push two ends of wire together until
strands of wire are close to insulation. |
| 10. |
Twist wires together, then solder connection
with rosin core solder. Do not use acid core solder. |
| 11. |
Center heat shrink tubing over joint
and heat using a suitable heat gun. Heat joint until tubing is tightly
sealed and sealant comes out of both ends of tubing. |
| 12. |
Repair wire repair procedure for each
wire on the connector. |
| 13. |
Tape wiring harness starting 11/2 inches
from behind connector and two inches past repair. |
| 14. |
Connect repaired connector. |
|
Wiring Connector Terminal Repair
| 1. |
Disconnect connector being repaired
from its mating half. |
| 2. |
Remove connector locking wedge. |
| 3. |
Position connector locking finger away
from terminal while pulling on wire to remove terminal from connector. |
| 4. |
Cut wire six inches from back of connector,
then remove one inch of insulation from harness side of wire. |
| 5. |
Select wire that best matches wire
being replaced. |
| 6. |
Cut repair wire to correct length and
remove one inch of insulation from end of wire. |
| 7. |
Place piece of heat shrink tubing over
side of wire. Ensure tubing will be long enough to cover and seal
entire repair area. |
| 8. |
Spread strands of wire apart on each
end of exposed wires. |
| 9. |
Push two ends of wire together until
strands of wire are close to insulation. |
| 10. |
Twist wires together, then solder connection
with rosin core solder. Do not use acid core solder. |
| 11. |
Center heat shrink tubing over joint
and heat using a suitable heat gun. Heat joint until tubing is tightly
sealed and sealant comes out of both ends of tubing. |
| 12. |
Insert repaired wire into connector
and install connector locking wedge. |
|
Crankshaft Position (CKP) System Variation Learn
| The Crankshaft Position (CKP)
system variation learn procedure must be performed when any of the following
service procedures have been completed: Engine replacement; control module
replacement; crankshaft balancer replacement; crankshaft replacement; CKP
sensor replacement. |
| 1. |
Install a scan tool and monitor ECM
for DTCs. |
| 2. |
If DTCs other than P0315 are set, diagnose
those codes first. |
| 3. |
With a scan tool, select CKP System
Variation Learn Procedure. |
| 4. |
Block drive wheels and set parking
brake, do not apply brake pedal. |
| 5. |
Cycle ignition from Off to On. |
| 6. |
Apply and hold brake pedal, then start
and idle engine. |
| 7. |
Ensure air conditioning is Off. |
| 8. |
Vehicle must remain in Park or Neutral. |
| 9. |
While learn procedure is in progress,
release throttle immediately when engine starts to decelerate. |
| 10. |
Engine control is returned to operator
and engine responds to throttle position after learn procedure is
complete. |
| 11. |
Accelerate to Wide Open Throttle (WOT)
and release when fuel cut-off occurs. |
| 12. |
If scan tool indicates that DTC P0315
ran and passed, CKP variation learn procedure is complete. |
| 13. |
If scan tool indicates DTC P0315 failed
or did not run, refer to DTC P0315 . |
| 14. |
If any other DTCs set, diagnose DTC. |
| 15. |
Turn OFF ignition for 30 seconds after
learn procedure is completed successfully in order to store CKP
system variation values in ECM memory. |
|
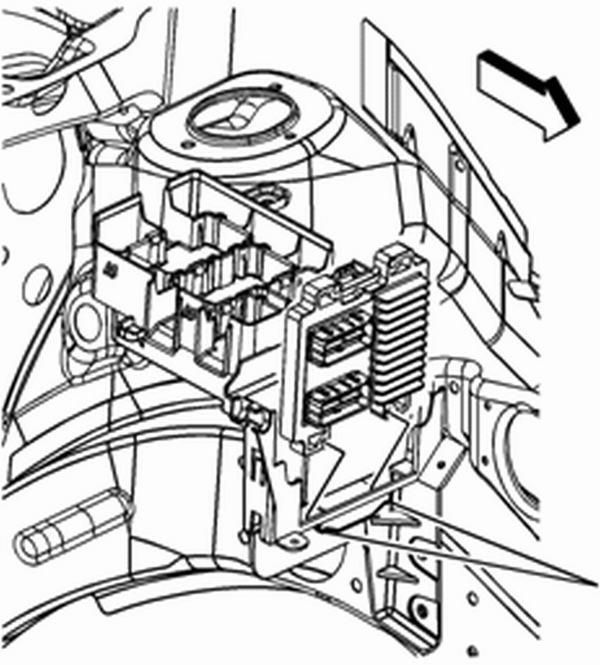
Fig. 1 ECM removal
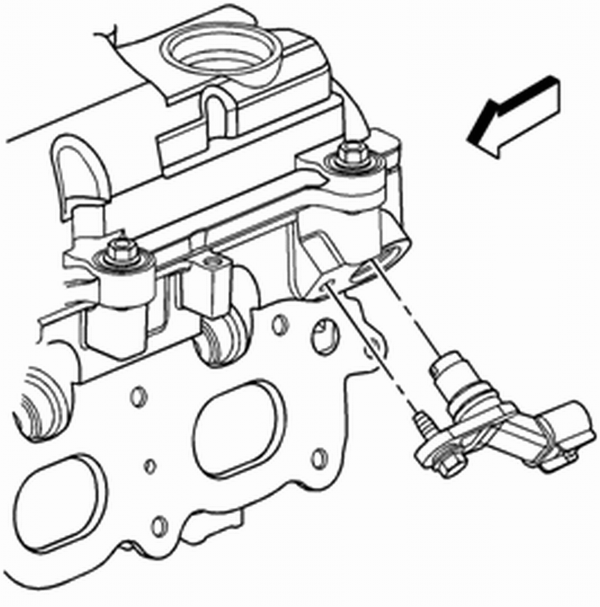
Fig. 2 CMP sensor removal
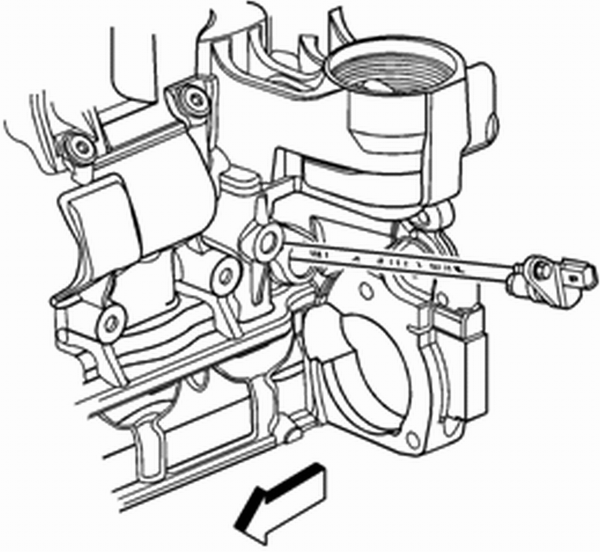
Fig. 3 CKP sensor removal
Air Bag Systems
Refer to "Air Bag System Precautions"
on main menu selection for "Precautions."
Battery Ground Cable
Prior to service, disconnect battery ...
See also:
Chevrolet Cobalt Service & Repair Manual. Precautions
Air Bag System
1.
Prior to disconnecting or servicing
any air bag components, disarm air bag system as outlined under
"Air Bag System Disarming & Arming."
2.
Air bag system components or seat belt
tensioner uni ...
Chevrolet Cobalt Owners Manual
Chevrolet Cobalt Service Manual
 Fuel Injection
 Precautions