Chevrolet Cobalt Service & Repair Manual: Component Replacement
Tire Pressure Indicator Sensor
| Each tire pressure sensor has
an internal power supply that has a service life of 10 years. |
Removal
| 2. |
Raise and support vehicle with jack
stands, then remove wheel and tire assembly. |
| 3. |
Prior to dismounting tire from wheel,
note following precautions: |
| |
a. |
Position bead breaking fixture 90°,
180° and 270° from valve stem when separating tire bead from wheel. |
| |
b. |
Position wheel and tire so valve stem
is situated at 7 o'clock position relative to head. Tire iron or
pry bar can be inserted when prying outer tire bead up and over
mounting and dismounting head. |
| |
c. |
Position wheel and tire so valve stem
is situated again at 7 o'clock position relative to head. Tire iron
or pry bar can be inserted when prying inner tire bead up and over
mounting and dismounting head. |
| 4. |
Deflate tire completely. |
| 5. |
Connect a suitable tire changer to
remove tire from wheel. A rim clamp European type tire changer is
recommended. |
| 6. |
Remove any rubber or corrosion from
wheel bead seat with a suitable wire brush or heavy steel wool.
Also, remove all residual liquid tire sealant from inside of tire
and wheel surfaces. |
| 7. |
Remove tire pressure sensor hex screw,
then pull sensor straight through wheel, Fig. 1. |
| 8. |
Remove tire pressure sensor valve stem. |
|
Installation
| 1. |
Clean any dirt or debris from grommet
sealing area of wheel. |
| 2. |
Position tire pressure sensor to valve
stem and install new hex head screw. Torque hex head screw
to 12 inch lbs. |
| 3. |
Apply tire soap to rubber portion of
valve stem. Using a valve stem installation tool, install valve
stem through wheel hole. New TPMS sensors are still shipped in Off
mode. Sensor will exit its Off mode when tire is inflated. |
| 4. |
Prior to mounting tire, use only an
approved tire mounting lubricant. Do not use silicon or corrosive
base compounds to lubricate tire bead and wheel rim. |
| 5. |
Position wheel so valve stem is at
7 o'clock position relative to head. This will protect sensor when
bottom bead seats. |
| 6. |
Connect a suitable tire changer, rotate
tire and wheel assembly clockwise when transferring tire bead to
inside of wheel rim. |
| 7. |
After bottom bead is on wheel, reposition
wheel and tire so that valve stem is at 7 o'clock position relative
to head. This will protect sensor while mounting tire bead to outside
of wheel. |
| 8. |
Connect tire changer to install tire
to wheel. |
| 9. |
Ensure that valve core is not installed,
then inflate tire to seat tire beads. Do not stand over tire while
inflating. When inflating tire, do not exceed 40 psi if beads are
seated. If 40 psi will not seat bead, deflate tire, lubricate beads
and inflate. |
| 10. |
Inflate tire to proper pressure. |
| 11. |
Install valve core to stem. |
| 12. |
Ensure locating rings are visible on
both sides of tire to verify that tire bead is fully seated on wheel. |
| 13. |
Install wheel and tire assembly on
vehicle, then lower vehicle and torque lug nuts to 100 ft.
lbs. |
| 14. |
Perform TPMS "Relearn Procedures." |
|
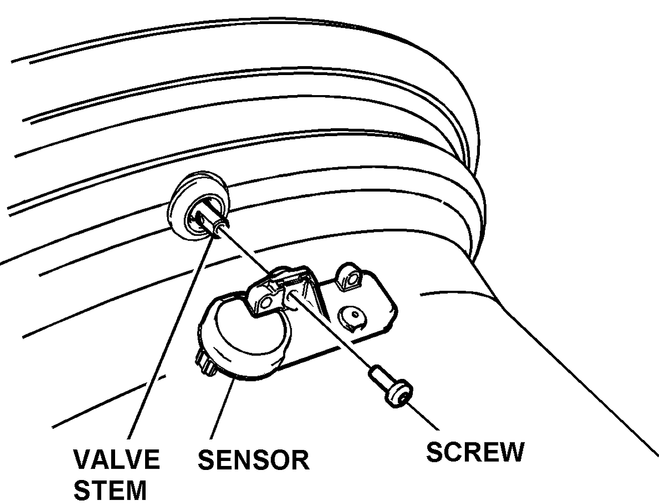
Fig. 1 Tire pressure monitor sensor location. Snap in style
The TPMS (Tire Pressure Monitor
System) warns the driver when a significant loss or gain of tire pressure
occurs in any of the four tires, and allows the driver to display the individua ...
See also:
Chevrolet Cobalt Owners Manual. Electronic Stability Control (ESC)
The Electronic Stability Control system assists with
directional control of the vehicle in difficult driving
conditions. The system turns on automatically every
time the vehicle is started.
- To turn off both traction control and Electronic
Stability Control, press and hold
until
illuminate ...
Chevrolet Cobalt Owners Manual
Chevrolet Cobalt Service Manual

 Description